The Complete Guide to Embedding a Twitter Feed
Written and tested by Darian Kanius
Sometimes you just want more out of your Twitter widget. This guide explains how to create, customize, and embed a twitter feed into your Muse website.
Creating a basic Twitter feed widget
Login to your Twitter account at http://www.twitter.com Look to the upper right of your dashboard menu bar and click on the options drop down menu (the gear icon) then select ‘settings’.

Once you are on the settings page select the 'Widgets' option at the bottom of the left sidebar menu.
Click 'Create new' to create a new widget

Within the widget creator you're presented with a few basic configuration options to customize your widget. Customizations you add will instantly appear in the preview window on the right of the configuration panel.

Here is a list of the basic design features with a brief description of what they do.
Username - Enter your Twitter username. Displays the user’s tweets in the timeline feed. You can add any user with a public account.Options
- Exclude replies: if checked will exclude any replies to tweets from your twitter feed.
- Auto-expand photos: if checked shows a thumbnail of any posted photo in the twitter feed.
Height - determine the height of the widget in pixels.
Theme - Changes the background and font colors of the timeline feed. There are two options. Light or Dark.
Link Color - This option allows you to change the link color to better suit your websites color scheme.
Once you have customized the basic design of your twitter feed you can copy the embed code directly underneath the preview window and add it into an Object > HTML widget in your Muse website. It will display right inside of ‘design view’ in Muse. To interact with it and to see it working preview it in a browser - File > Preview page in browser.

Advanced customization options
For those that would like more flexibility and customization, Twitter has provided us with the ability to overwrite certain default options by using client side CSS. Don’t run away, it will all make sense soon.
To utilize these options we will have to implement them directly into the embed code we added to our Muse site. This means making a few simple text changes to code.

You can see the list of additional options and explanations of what they do by clicking on "the customization documentation" link under the 'link color' entry box.
To get you up to speed quickly, here’s a breakdown of all of the advanced options and a few examples of how to use them.
Advanced client side options
Change dimensions: This allows you to determine the height and width of the widget.
width="300" height="500"
Changing theme color: Currently there are only two options. Dark and Light.
data-theme="dark" data-theme="light"
Change Link color: This allows you to set a link color using a hex color code. Hex codes look like this: #FF6A00
data-link-color="Hexcode"
Change Border color: This allows you to change the border color using a hex color code.
border-color="hexcode"
Change the widget layout by using ‘data-chrome’ attribute.
Use spaces to separate the following options.
noheader - gets rid of the header including the 'Tweet' title and the ‘Follow@user’ button.
nofooter - Gets rid of the footer including the reply text entry box.
noborders - gets rid of the borders surrounding the timeline widget.
noscrollbar - gets rid of the scrollbar, still allows scrolling via mouse wheel.
transparent - makes the background of the timeline transparent.
Example code:
data-chrome="nofooter transparent noheader noborders noscrollbar"
Tweet Limit: This allow you to determine how many tweets are visible at one time. "5" is the tweet count number that indicates how many tweets will show on the timeline.
data-tweet-limit="5" Min 1 Max 20.
Be warned that it will expand to fit the tweet number you provide without a scrollbar. Since the widget is a fixed size, it will not poll for updates when using this option. New tweets will show up on a web page refresh.
Examples - Advanced Client Side Options
Now that we have a list of all of the options to customize our timeline let’s take a look at a few examples of how we would go about adding them into the embed code.
Here is a similar embed code to the one you embedded into the HTML widget on your Muse site when you created the basic Twitter feed.
<a class="twitter-timeline" href="<a href="https://twitter.com/MuseThemes">https://twitter.com/MuseThemes</a>" data-widget-id="360490624081866752">Tweets by @MuseThemes</a><script>!function(d,s,id){var js,fjs=d.getElementsByTagName(s) [ 0 ] ,p=/^http:/.test(d.location)?'http':'https';if(!d.getElementById(id)){js=d.createElement(s);js.id=id;js.src=p+"://platform.twitter.com/widgets.js";fjs.parentNode.insertBefore(js,fjs);}}(document,"script","twitter-wjs");</script>
The only part of the code we have to look at for editing is the top half. The bottom half is the JavaScript that displays the twitter feed on your website.
Edit this half:
<a class="twitter-timeline" href="https://twitter.com/MuseThemes" data-widget-id="360490624081866752">Tweets by @MuseThemes</a>
Now all we have to do is add the client side options inline. Here are a few examples of how you would go about adding these options.
Transparent Background
To make the background transparent we will need to use the ‘data-chrome’ variable along with the ‘transparent’ value. Here is what that would look like in the code.
<a class="twitter-timeline" href="https://twitter.com/MuseThemes" data-widget-id="360490624081866752" data-chrome=”transparent” >Tweets by @MuseThemes</a>
When adding any option make sure you enter them in the opening <a> tag and separate them with a space.
Here is an image of the twitter feed with a transparent background.
![]()
Removing the background allows you to overlay the feed over interesting texture of imagery, giving you a more consistent look. In the example above, the grey link colors clash with the background, so let's change the default link colors.
Changing the Default Link Color
We will continue using the code in the previous example and change the link color for better readability and consistency.
To change the default link colors we are going to use the ‘data-link-color’ option along with a hexcode color.
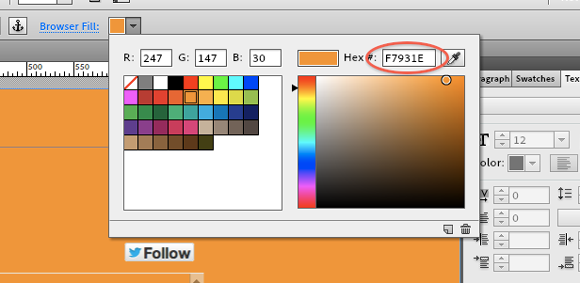
I want to find a color that better suits my website color scheme so I am going to go with white. You can find a color’s hexcode in the color panel on Adobe Muse in the upper right. Make sure to add the # to the beginning of the hexcode number in your code. Example #FFFFFF.
Add your hexcode into the Twitter embed code:
<a class="twitter-timeline" href="https://twitter.com/MuseThemes" data-widget-id="360490624081866752" data-chrome=”transparent” data-link-color=”#FFFFFF”>Tweets by @MuseThemes</a>
Now you will see that our link colors have turned white and look better against the orange background.
![]()
Removing the Header & Footer
The next example removes the header and footer area of the twitter feed, which contains the follow button and an area to enter a tweet. We will be using the ‘data-chrome’ variable again but we will not have to add the variable again. All we have to do now is add the ‘noheader’ and ‘no footer’ values after the ‘transparent’ value we have already entered. Here is how it will look in the code.
<a class="twitter-timeline" href="https://twitter.com/MuseThemes" data-widget-id="360490624081866752" data-chrome=”transparent noheader nofooter” data-link-color=”#FFFFFF”>Tweets by @MuseThemes</a>
You can do this with all of the data-chrome options listed above in the advanced options breakdown.
Here is an image of the feed with no header and no footer.

There you have it. A quick and easy way to add and customize a twitter feed into your Muse website.
You can check out the twitter feed widget I created for this tutorial here.
http://dariank.ca/musethemes/twitterfeed/index.html
Create awesome things.
Darian Kanius

Comments

I would also like to know if there is a way to add an iframe for twitter without a scroll bar on the side. Thanks for all your good information and themes for muse.

Hi I have just watched your tutorial on lynda.com creating a portfolio website in muse I think it is the best tutorial of muse i have ever seen yet. Great job!
I have one question left please tell me how do you do the form technique.i.e when a user see the option ‘NAME’ in a form and when he/she clicks it changes in to a simple ‘I’ and then the user can type his name .. it is like overwrite the form (just like I did now for this form on your blog here) … Hope you get the point, How can i do that in muse? and lastly can I remove these rectangles in the form and just use a single line?

Absolutely brilliant, thanks. Is there a way to change the font in the feed?

Maybe enough news on this topic?,

This is really helpful.. thanks!
I can get the Twitter feed to show up, but no matter how I try to lock the width and height of the container (even restricting the number of tweets etc) it keeps flipping to a very tall container.. is this a bug? or am I missing something..
It is possible to build an iframe with a blog page and add this script to load more posts without scrollbar?
The website made with Muse and the iframe is this: meninasreais.com.br
Thank you for your attention